Installing Jupyter Notebook on AWS EC2 quickly
This tutorial will explain How to install and configure Jupyter Notebook on AWS EC2(Amazon Linux 2/ EC2 Ubuntu)
Jupyter Notebook
Jupyter Notebook is a very powerful tool for developing and presenting data science projects. It is a very flexible and popular tool which enables you to put your code, output of the code , any kind of visualization or plot etc. in the same document.
Install and configure Jupyter Notebook on AWS EC2
Step 1 – Launch EC2 Instance
Please follow the following Link to if you want to launch an EC2 Linux Instance
How to launch EC2 Linux Instance on AWS
If you already have your EC2 Instance launched, skip this step.
Step 2 – Install Anaconda on EC2 Instance
In this tutorial we will Install Anaconda for running Jupyter Notebook. This is one of the easiest method to Install Jupyter Notebook.
To install Anaconda on EC2 Instance please follow the following Link
How to install Anaconda on EC2 Instance
Step 3 – Configure Jupyter Notebook
Generate Jupyter Notebook Config
After successful Anaconda Installation, generate Jupyter config file using following command.
$ jupyter notebook -generate-config
Writing default config to: /home/chandan/.jupyter/jupyter_notebook_config.py
Jupyter notebook allow remote access
Open the above generated path using Nano or Vi Command.
$ nano /home/chandan/.jupyter/jupyter_notebook_config.py
You may get the following commented line(#) for listing IP address. Add the a line c.NotebookApp.ip = ‘0.0.0.0’ without comment(#) and save the file and exit using CTRL + O and CTRL + X command to allow Jupyter Notebook to be accessed worldwide.
You may also enter your Office Wan IP / Home broadband IP instead of 0.0.0.0 to allow it accessing form your Office or Home Network only.
## The IP address the notebook server will listen on.
#c.NotebookApp.ip = ‘localhost’
c.NotebookApp.ip = ‘0.0.0.0’
Reset Jupyter Notebook Password
$ jupyter notebook password
Enter password: ———————-> Enter your Password
Verify password: ———————-> Re Enter your Password
[NotebookPasswordApp] Wrote hashed password to /home/chandan/.jupyter/jupyter_notebook_config.json
step 4 – Allow AWS Jupyter Notebook default port i,e 8888 for your Home or Office Network Wan IP or for all network(0.0.0.0) in the Amazon EC2 security group.

Step 5 – Start Jupyter Notebook and login
Use the following command to start Jupyter Notebook
$ jupyter notebook
You can also run it using following command to run the jupyter notebook even after closing the session so as to keep jupyter notebook running on server
$ nohup jupyter notebook &
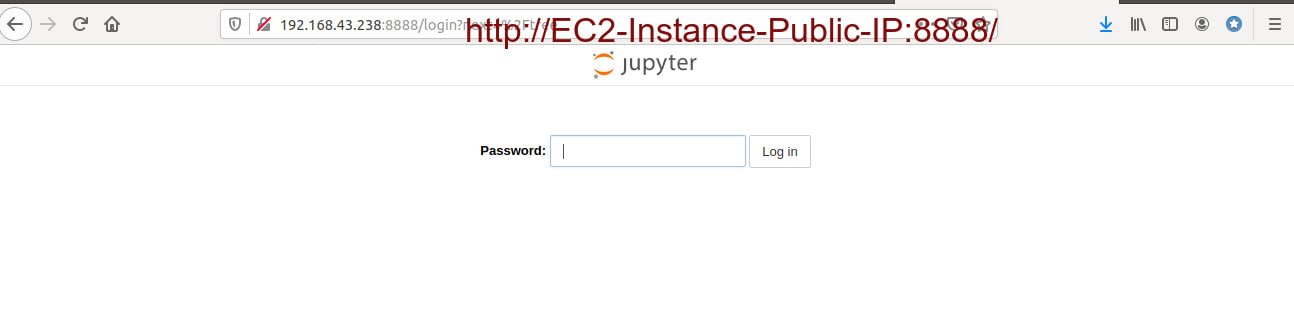
Step 6 – Access jupyter notebook remotely
Now open the following URL on your office or home computer ( For which you have allowed remote access)
http://EC2-Instance-Public-IP:8888/
Enter your password and login to Jupter Notebook remotely
Click to tweet this tip !
I hope you enjoyed this tutorial and learned about how to install Jupyter Notebook on AWS EC2 Instance. If you think this is really helpful, please do share this article with others as well. Please also share your valuable feedback, comment, or any query in the comment box. I will really happy to resolve your all queries any.
Thank You
If you think we have helped you or just want to support us, please consider these:-
Connect to us: Facebook | Twitter

(Renewed) Lenovo Tab M10 HD (2GB, 32GB, WiFi) Slate Black
 (4)
(4)